FAST USA 2-5 DAYS SHIPPING
Tutorial for Creative Epoxy Resin Ideas and Projects with Wood Epoxy

Epoxy Resin Art can offer a huge variety of different works possibilities: from jewelry, coasters, trays, geode art, resin knifes, surfboards, ashtrays, card holders, phone cases, moulding in combination with wood, cutting and ocean waves to river table tops or countertops! In this article we will show you the instructions, step by step tutorial and best application possibilites on how to create your first amazing resin work!
What is Epoxy Resin Art?
Epoxy Resin contains two part components – Resin and Hardener. When these 2 parts are mixed together with a 1:1 ratio, a chemical reaction occurs and liquid mixture hardens into a hard as rock mixture - solid plastic. The result is a high gloss, clear, water, scratches resistant surface. Two-component material cures within a 2-3 hours of the resin and hardener mixed together and can be polished, cut or ground.
The difference between polyester and polyurethane resins is epoxy shrinks way more less during curing process. If the liquid mixture shrinks during curing, areas must be applied with another coat of layer. It is not cheap and costs time, it's worthwile to use a highest quality products from beginning. Resin material is used not only in science, photography industry and boat building, but also in different type of Art.
Mix Resin and Hardener properly according to the supplier instructions. This will create a high-quality and good looking surface. The mixture will cure completely over 48 hours. It also depends on a number of different factors such as the type of resin and hardener, heat and the temperature of the substrate, ambient temperature. Heat is the most important thing of all factores, the hotter the mixture – faster curing process.
Different Resin Applications in Art
Resin art is getting more and more known. There are so many work possibilities of art that enchant with their luminosity, clarity, depth of various shades and brilliance. Color additives or pigments mixed with resin creates a brilliant and marbled look. A lot of different and unique effects can be created or found by choosing the painting ground ( the type of the colorants and casting ).
If you love experimenting with art creations, you will definitely like working with epoxy resin, here are few ideas:
Drawings, pictures or photos made of alcohol ink, watercolour, acrylic, oil, mixed media, acrylic paint can be finished with Resin. This will create a perfect shine and protection from UV light.
Epoxy can also be used on wood, create your own geode art, charcuterie board or build your own epoxy river tables.

Supply list you will need for the Wood and Epoxy
- ResinTint, liquid pigments
- Metallic and Pearl Colors
- Glow in the dark or Neon colors
- Mica Powder Pigments for Resin
- Alcohol Ink
- Airbrush colors kit
- Mixing Cups and Stir Sticks
- Heat Gun or Butane Torch ( to remove bubbles out of epoxy resin )
- Nitrile Gloves and Respirator Mask
- Polisher
- Painting Ground – Wood Panels
- Silicone Oil
- Grinding and Polishing paste
- Wood Oil
- Eye Protection
Which Resin is Best for Woodworking?
Before choosing your resin, you must decide which application is going to be made. Wood is sensitive to air humidity.
- Low-viscosity ( viscous ) resin for casting molds filling voids in wood
- High-viscosity resin for coating layers on surfaces or wood panels
Resistance to Yellowing / Ultraviolet Protection
Crystal Clear Resin reacts differently to UV radiation. In time clear resin tends to turn yellow due to sunlight. Baltic Day resin is a highest UV-resistant epoxy resin and resists to yellowing. Ideal for outdoor applications or any furniture. Therefore, there are other additives which can be added to protect against UV rays and better light resistance.

The Best Resin for Wood Projects
Baltic Day resin is highest quality, certified and non-toxic product. No solvents, odourless, non-flammable and Easy to use 1:1 ratio formula is a perfect choise to use for resin paintings.
Baltic Day professional products were developed with the mission of creating a resin without toxic substances, non-yellowing formula, high quality, less shrinkage, good compatibility, certified and non-toxic. This resin does not contain any solvents and hardly evaporates. Baltic Day resin contains a highest-quality UV filter that protects your cured art work from UV radiation and yellowing.
Surface Hardness
After curing process, there can be a difference in the hardness of surface. There are soft and resistant to temperature, scratches products. For most used objets such as counter tops, table tops, cutting boards and other commonly used items that are exposed to high mechanical stress, we recommend to buy a more expensive, higher quality resin.
TIP: Make sure you are mixing Resin correctly. Check out our blog – Measuring and Mixing Epoxy Resin – Top Tips on How to Mix Epoxy ( GUIDE )?

Layer Thickness per Casting and Coating
Usually resin can usually cast the maximum layer thickness of 2cm. If you will pour a large amount of resin, the chemical reaction will occur a heat, which will cause to harden mixture immediately and leave unsightly, sticky or tacky spots.
TIP: Check out our blog – My Resin is Tacky – How do I harden Sticky Epoxy?

- Baltic Day Epoxy Resin creates a high-gloss and amazing durable finish
- Improved Impact Strength and Surface appearance
- UV protection and Blush Resistant
- Perfect Color Stability and Air Release
- Tough and Water Resistant Coating
Step 1: Prepare Wood for Epoxy Resin
The wood surface should be prepared thoroughly before coating with epoxy resin. To avoid bubbles in epoxy resin, or blisters, vacuum up all dusts from the surface.
- Surface must be cleaned, free from amy dusts
- Sanded
- Degreased
- No pet hairs or fibers
- Dry
For small surfaces, can be easily sanded by hands. For Large areas such as countertops, wooden tables or resin furniture, use a Multi-Sander or Orbital Sander.
Step 2: Mixing and Measuring Epoxy Resin
Epoxy resin includes two part system: Resin and Hardener. To achieve perfect results, components must be mixed together in a bucket or container. The entire mixing procedure must take atleast 4-7 minutes.
The manufacturer's mixing instructions are very important to making sure you achieve the best results. The right produce for mixing resin will determine success or failure in processing. Once the mixture is mixed very well, in the end, it needs to have an uniform fluidity without any stripes. Then you can add the resin pigments or liquid dye.
We always recommend to wear a respirator or mask, nitrile gloves and work in a well ventiliated area to avoid contact with the fluid. There are 4 different Ratio Resins: 1:1 ratio ; 2:1 ratio ; 3:1 ratio ; 4:1 ratio. The mixing ratio has to be very precise, otherwise mixture will not work as expected.
Wooden sticks, plastic or wooden spatulas are great for mixing small amounts of resin. For bigger projects, use a mixer.
Tip: Bubbles may appear during the pour, check out our blog - How Do I Get Bubbles Out Of Epoxy Resin?

First Project: Wooden Surfaces
Resin can be used for sealing wooden surfaces, making it waterproof and resistant to mechanical stress. Applications are endless:
- Cutting Boards
- Table Tops
- Wooden Furniture
- Floors
- Kitchen countertops
How to Apply Epoxy Resin to Wood?
1. The substrate and Surface must be dry and clean. Oil residues, wax, dusts or grease should be removed before the pour in order to achieve great results. To ensure that substrate is dry, you can use a torch or heat gun to dry the surface. Once you dryed the surface, you can sand the surface by hand or sandpaper. Note: Wood such Olive, Teak or Tropical hardwoods like teak, ipe, bubinga or lignum vitae are very oily. To facilitate the sanding process, you can add acetone to improve the wood adhesion.

2. Remove the dust from the surface with vacuum cleaner or dust-free cloths. After you carefully cleaned the surface, do not touch with hands or put on items. Even, small dusts can again contaminate the surface.
3. Tape the edges around the surface to avoid dripping and run over onto the floor. Use only high quality adhesive tape which can withstand the pressure of the resin mixture.
4. Calculate the required amount of resin for your project ( use in advance to avoid too little ). Mix very well and properly for atleast 4-7 minutes. Poorly mixed mixture will leave lumps and sticky glue on the edges. Use a stir sticks for small and resin mixer for big projects.
5. Now you can add resin colors into mixture. You can add resin pigments, liquid dye, alcohol inks, even kitchen supplies such as spices, sidewalk chalks or even cosmetic products – eyeshadow powders.
Tip: Check our blog - How To Color Clear Epoxy Resin - Best Resin Colorants for Coloring?

Baltic Day pigments are specially formulated for Resin Art. Create deep metallic and shimmer effects in casting and coating epoxies. Metallic Resin Dye will create gorgeous rippled metallic and shimmery effects in river tables, wooden boards, counter tops, floors, castings, coatings and much much more!
Looking for a perfect color idea? You can easily discover new colors with our metallic pigment colours! Mix multiple mica metallic flakes into an epoxy, urethane or polyester coating then apply to your projects!
Create “Marbled” effects, try carefully pouring resin tinted with multiple colors together. BALTIC DAY resin powders can also be combined with other brands tinting pigments to add some sparkle to tinted resin.
You will definitely find all the colors your are looking for! BUY BALTIC DAY PIGMENTS HERE
6. Pour the epoxy resin over the surface and spread it over the entire wooden surface with plastic spreader. Pour the mixed resin in a spiral pattern form to ensure even distribution of mixture. If you calculated the right amount correctly for your project, a surface will be completely covered that levels out automatically.

7. After resin is poured and spread around the surface, the bubbles may appear. Use a torch burner, or hot/heat gun to remove the bubbles. Air bubbles rise to the surface and burst until heat is applied.
Bubbles are the most common problem in epoxy working and usually appears in the wood cracks. If you will not remove them, it can completely ruin the finish of your project.
If the bubblies are coming into the epoxy from outside, you should work in a warmer place with no humidity, as an example in your home room.
If the bubbles come from the poured surface material, you should use the heat gun or torch. You can check the video below.
Tip: Check our blog - How Do I Get Bubbles Out Of Epoxy Resin?
8. Resin will cure completely in 48 hours. If mixture is already solid, but not yet fully cured, apply one more coat.
Can I Apply Epoxy Resin to Stained Wood?
Yes, you can apply epoxy resin over a stained piece of wood, but you must be sure that the resin is compatible with the stained surface – always test in advance to avoid huge mistakes! Keep in mind that the stain is 100% dry before the surface is further processed. All colour stains are compatible with resins, but we always recommend to test with a small piece to avoid ruining the project.
Tip: Use stains that are as UV-Stable as possible! You don't want to remove the epoxy resin from a huge areas. It takes a lot of time and energy..
Second Project: Filling and Repairing Wood with Epoxy – Resin Wood Filler
Woods such as old wood with cracks, grained or knotty pieces with knots are perfect details in woodworking with epoxy resins. Cracks and holes can be filled with colored epoxy resin for projects such as tables or cutting boards. We will show you a step by step guide how to easily do this.

- Surface Preparatio. If you have a wood for board or table with holes or cracks, the first thing you need to do is check if resin can't drain through the bottom. Remove all dust or pieces of bark that are not suitable for project. All holes should be taped all around or use silicone sealant to prevent leaking out on the back and avoid drips.
- Mix and Pour epoxy resin. We always recommend to color the resin so there is a brilliant contrast. White, Black, Blue pigments looks very attractive on cracked wooden tables and cutting boards! Glow in the dark colors looks amazing in the night! Tip: Mix 2-3 colors at once to discover breathaking color combinations!
- Once you filled holes and cracks, take one more look and check if mixture has not sunk in again. The epoxy shrinkage has a big impact for curing, the less shrinks – the less sinks!
- Fill more resin into the crack and holes than you planned to avoid incomplete cure. Residues can be easily removed with sandpaper.

Project 3: Resin Casting with Wood – Epoxy Casting
Almost any wood pieces can be cast in epoxy resin: to make a vivid grain, burling or wooden squares for turning into any woodwork. Pieces of decorative art or Jewellery: necklases, bracelets, rings, chains, pendants or earrings can be made out of resin.
Tutorial guide for Casting Wood in Epoxy Resin:
If you want to cast moulds, for this casting application:
- Use a Silicone moulds, which are available in hundreds of different shapes and sizes to create pendants, ornaments or cabochons that you can use for a necklace, keychain, bracelet, earrings or even a small chandelier and much more! Just simply place the piece of wood in the silicone mold and then pour in the mixture.
- Silicone molds made of synthetic resin ( Self-made angular casting mooulds ) - use resin-coated panels, seal with silicone caulking and spay silicone oil.

Colored Epoxy Resin – Create Contrast with Wood
Resin mixture can be used when it's clear and transparent or colored with resin dye. There are endless of possibilites, such as glow in the dark, transparent – translucent, metallic effects, opaque or pearlized liquid colors. However each colorant has advantages and disadvantages.
Check out our latest blog - How To Color Clear Epoxy Resin - Best Resin Colorants for Coloring
We highly recommend TOP RATED Baltic Day Epoxy Resin Color Pigments
Sanding after Resin Curing
Recommend time for epoxy resin sanding is 2 and 3 days (48-72hours). But we always recommend to wait a little bit longer – atleast a week before sanding and polishing the surface. Not well cured resin can be soft under the surface and will not be easy to create a perfect finish. Completely hardened surface – sanding and polishing becomes more difficult.
Small objects of the surface – use sandpaper with a fine grain. Always sand from coarse grit (80 grit) to fine grit (2000 grit). For small castings – sand by hand.
Large surfaces: River tables, countertops, floors, boards – use an orbital sander or eccentric sander.
Tip: try wet sanding method – produces slighty finer sanding pattern and it is more effective way to sand.

Final Step – Polishing and Oiling your Project
The cured resin does not requires further treatment. Fine stress marks and a lof gloss in the epoxy may still be obtained by sanding. Wood needs treatment to avoid being exposed to liquids.
A cloth and polishing paste are great for the small pieces. Rub in a circular motion over the surface, ( don't spread the paste onto the wood – the pores will get clogged ).
For large objects – use a polishing machine. It does the job in a very short time and results are way more better than polishing with hands.
- Wipe the paste around the surface carefully, be sure there is no lumps or residues left.
- If you are not happy with the results, wipe the polishing paste away again.
- Use a high-quality wood oil – apply on the surface, wait for a few minutes and then wipe dry.
Project 4: How to Fix Wood with Epoxy Resin – Repairing Guide
It takes a lot of stress when you discover that your working wood has been rotted. If you are not able to figure how to fix riddled with rot wood, then use this simple technique.
The wood is rotting due to moisture that is emitted through other object. We recommend to change the rotten part to more resistant to moisture and add a sheet of metal in between to avoid any other contact.
Another problem is the old and ineffective paint on the woods - the wood absorbs water and rots. It's very easy to fix this problem, just apply another coat of paint.
Do I need to Use Epoxy on Rotted Wood?
Epoxy is a very popular way of replacing rotted wood, it's easy and quick to work with. For the historic wooden items such as furniture, epoxy might not be the best way to use! You should consider using traditional repairs made of wood.
We recommend to use Epoxy for working on rotted wood:
- 15-25% of the wood is rotten. If you want to achieve best result – epoxy resin needs a little bit of the rotted wood to bond.
- Projects that is hard to replace with wood or can't be easily removed to be replaced.
- Soak the damaged wood thoroughly in an epoxy consolidant before working with epoxy – this product will seal the wood and ensure to stop futher rot and decay.
- Fully strip all the decayed wood – it's possible that you will need to coat the exposed wood in an epoxy primer or consolidant.

Determine why the wood was rotting and fix it otherwise the problem might return. The repair can be easily conducted with new materials and eliminating the main reasons why this happened. Sometimes it's becoming a hard task to complete, then epoxy resin can help!
The only thing that you will have to do with your epoxy, is that you must dry the wood completely. Otherwise, the wood can rot further doe to the moisture trapped.
Step 1: Save or Take Out the Damaged Parts of Wood
Determinte the extent of damage by poking the rotten parts with screwdiver, paint scraper or chisel. Remove these parts or secure with an epoxy consolidant.
Once you determined how much the wood is damaged, take off the upper layer of old paint with the rotten parts.

If you think you can save the wood, then drill 0.25 inch holes and let the epoxy consolidant work. Resin consolidant will soak into the rotten piece of wood and moisture will get space to exit letting the epoxie soak.
If you accidentally drill through the wood, use the clay or putty to secure the wood bottom and stop consolidant from leaking.
Step 2: Liquid Epoxy Resin Consolidant
Always be sure you are working in a well ventilated area, wear gloves, eye glasses, a mask or respirator to counter the fumes. Follow the manufacturer's instructions how to use resin consolidant. The most common epoxy resin ratio is 1:1, it's easy to work with but remember – epoxy resin must be mixed correctly and properly.
TIP: Check our blog how to mix epoxy resin properly- https://balticday.com/blogs/news/how-to-measure-and-mix-epoxy-resin-and-hardener-5-easy-steps

Once you calculated and mixed mixture correctly, squeeze it into the wood holes and voids for the repair purposes. A small plastic spreader or brush can help to apply resin consolidant beautiful and with ease. Do it untill the entire surface is saturated and has obsorbed consolidant thoroughly.
After you applied consolidant, it's important to know that wood must dry completely in 5-7 days. Protect the entire surface from dust with a plastic cheet. You can also speed up this process by placing the sheet into warm place – outside during the great weather.
Step 3: Prepare the Filler for the Surface
Surface preparatio is very important whether you are applying fabrics, bonding or fairing. The success of your project depends on the strength of the mixture and how well the epoxy resin adheres to the wood surface. Even if the resin consolidant has not solidified completely, you can prepare the filler for the external surface.

Scoop A and B parts of the filler equal to the size of a tennis ball using a plastic stick. Mix them thoroughly atleast 5-7 minutes. If the new brand epoxie resin is mixed with the other manufacturer's remains of hardened resin, it will react a chemical reaction and reduce your working time.
The temperature must be around 23 °C. The warmer temperature – the faster the mixture will harden, the colder – will take more time to harden. That's why we always recommend to work in a room temperature and all working space.
Step 4: Use Epoxy Filler to fill the Cavities in Wood
Epoxy filler is a solvent-free plastic filler that can be used as wood filler, concrete, GRP filler or plastic filler. It will easily help you to repair and seal holes and cracks in damaged wooden surfaces. Putty knifes are very usefull repairing tool for wood working. It's a perfect knive for scraping away loose paint and putty during wood repair. Squeeze the filler into the broken wood areas, use a bit of force to bond epoxy resin and wood.
Before working with the epoxy filler, for deeper areas, we recommend to carve parts of other wood and fix these wood block after the project completed ( make sure that all the pieces are of the same material ). For the best results, you can also add some resin paste.

Step 5: Shape and Modify the Filler Shape
Use your fingers to get the shape you want. Hardness of the mixture is important for modifying shape. If resin doesn't dent, then you can fill with 80grit Sandpaper. Just simply fold the sand paper around a shape and sand more accurately. Do it thoroughly and don't rush the process.
If you removed to much of epoxy resin mixture, you can add a second layer of coat. Just be sure that the first layer is dusted, for thinner layer – mix consolidant and add filler to get the correct consistency of mixture. Heat the new layer to avoid bubbles and keep sanding with 80 grit paper, to refine your work – use 120 grit sand paper.
Top 5 Epoxy Resin Processing Challenges - How to Fix Resin Issues
How to Fix Cloudy, Milky Resin?
Milky resin appears when you didn’t removed the tiny microbubbles from your mixture. Most ofthen, cloudy resin happens when your resin is TOO COLD. Before working with epoxy resin, you should put your resin box into room temperature for atleast 24 hours and then start working.
- Resin is too cold or old and has exceeded it’s shelf life.
- You mixed with the incorrect mixing ratio.
- You are using a poor quality and low-grade resin.
Not Mixing Enough
Once you mixed both parts – Resin and Hardener equaly, it is important to remember that both parts must be mixed thoroughly. If material will not be blended enough, it will not cure completely. Mix atleast 3-7 minutes, scraping the side and bottom of the bucket or container.
Incorrect Resin Measuring
Baltic Day resin is a 1:1 ratio and was specially formulated to measure by volume ( not Weight ). It is very important to measure both parts even to ensure the resin cures properly. Material that cannot properly catalyze will remain sticky/tacky and uncured.

Adding to Much Hardener to Speed Up Curing Time
Sometimes artists trying to speed up the curing process by adding more hardener. IT WILL NOT WORK! Baltic Day resin cures within 24 hours – fully in 72 hours. The best tip to speed up the cure time is to increase the working/room temperature.
Clear Resin turn Yellow – How to Fix Yellowing Problem?
- Resin Kit is old – use resin which is produced within one year of manufactured date.
- Resin is oxidizing – bottles which are not closed will exposure to oxygen in the air - will cause yellowing process.
For transparent or crystal clear projects such as river tables use resin that protects against yellowing.
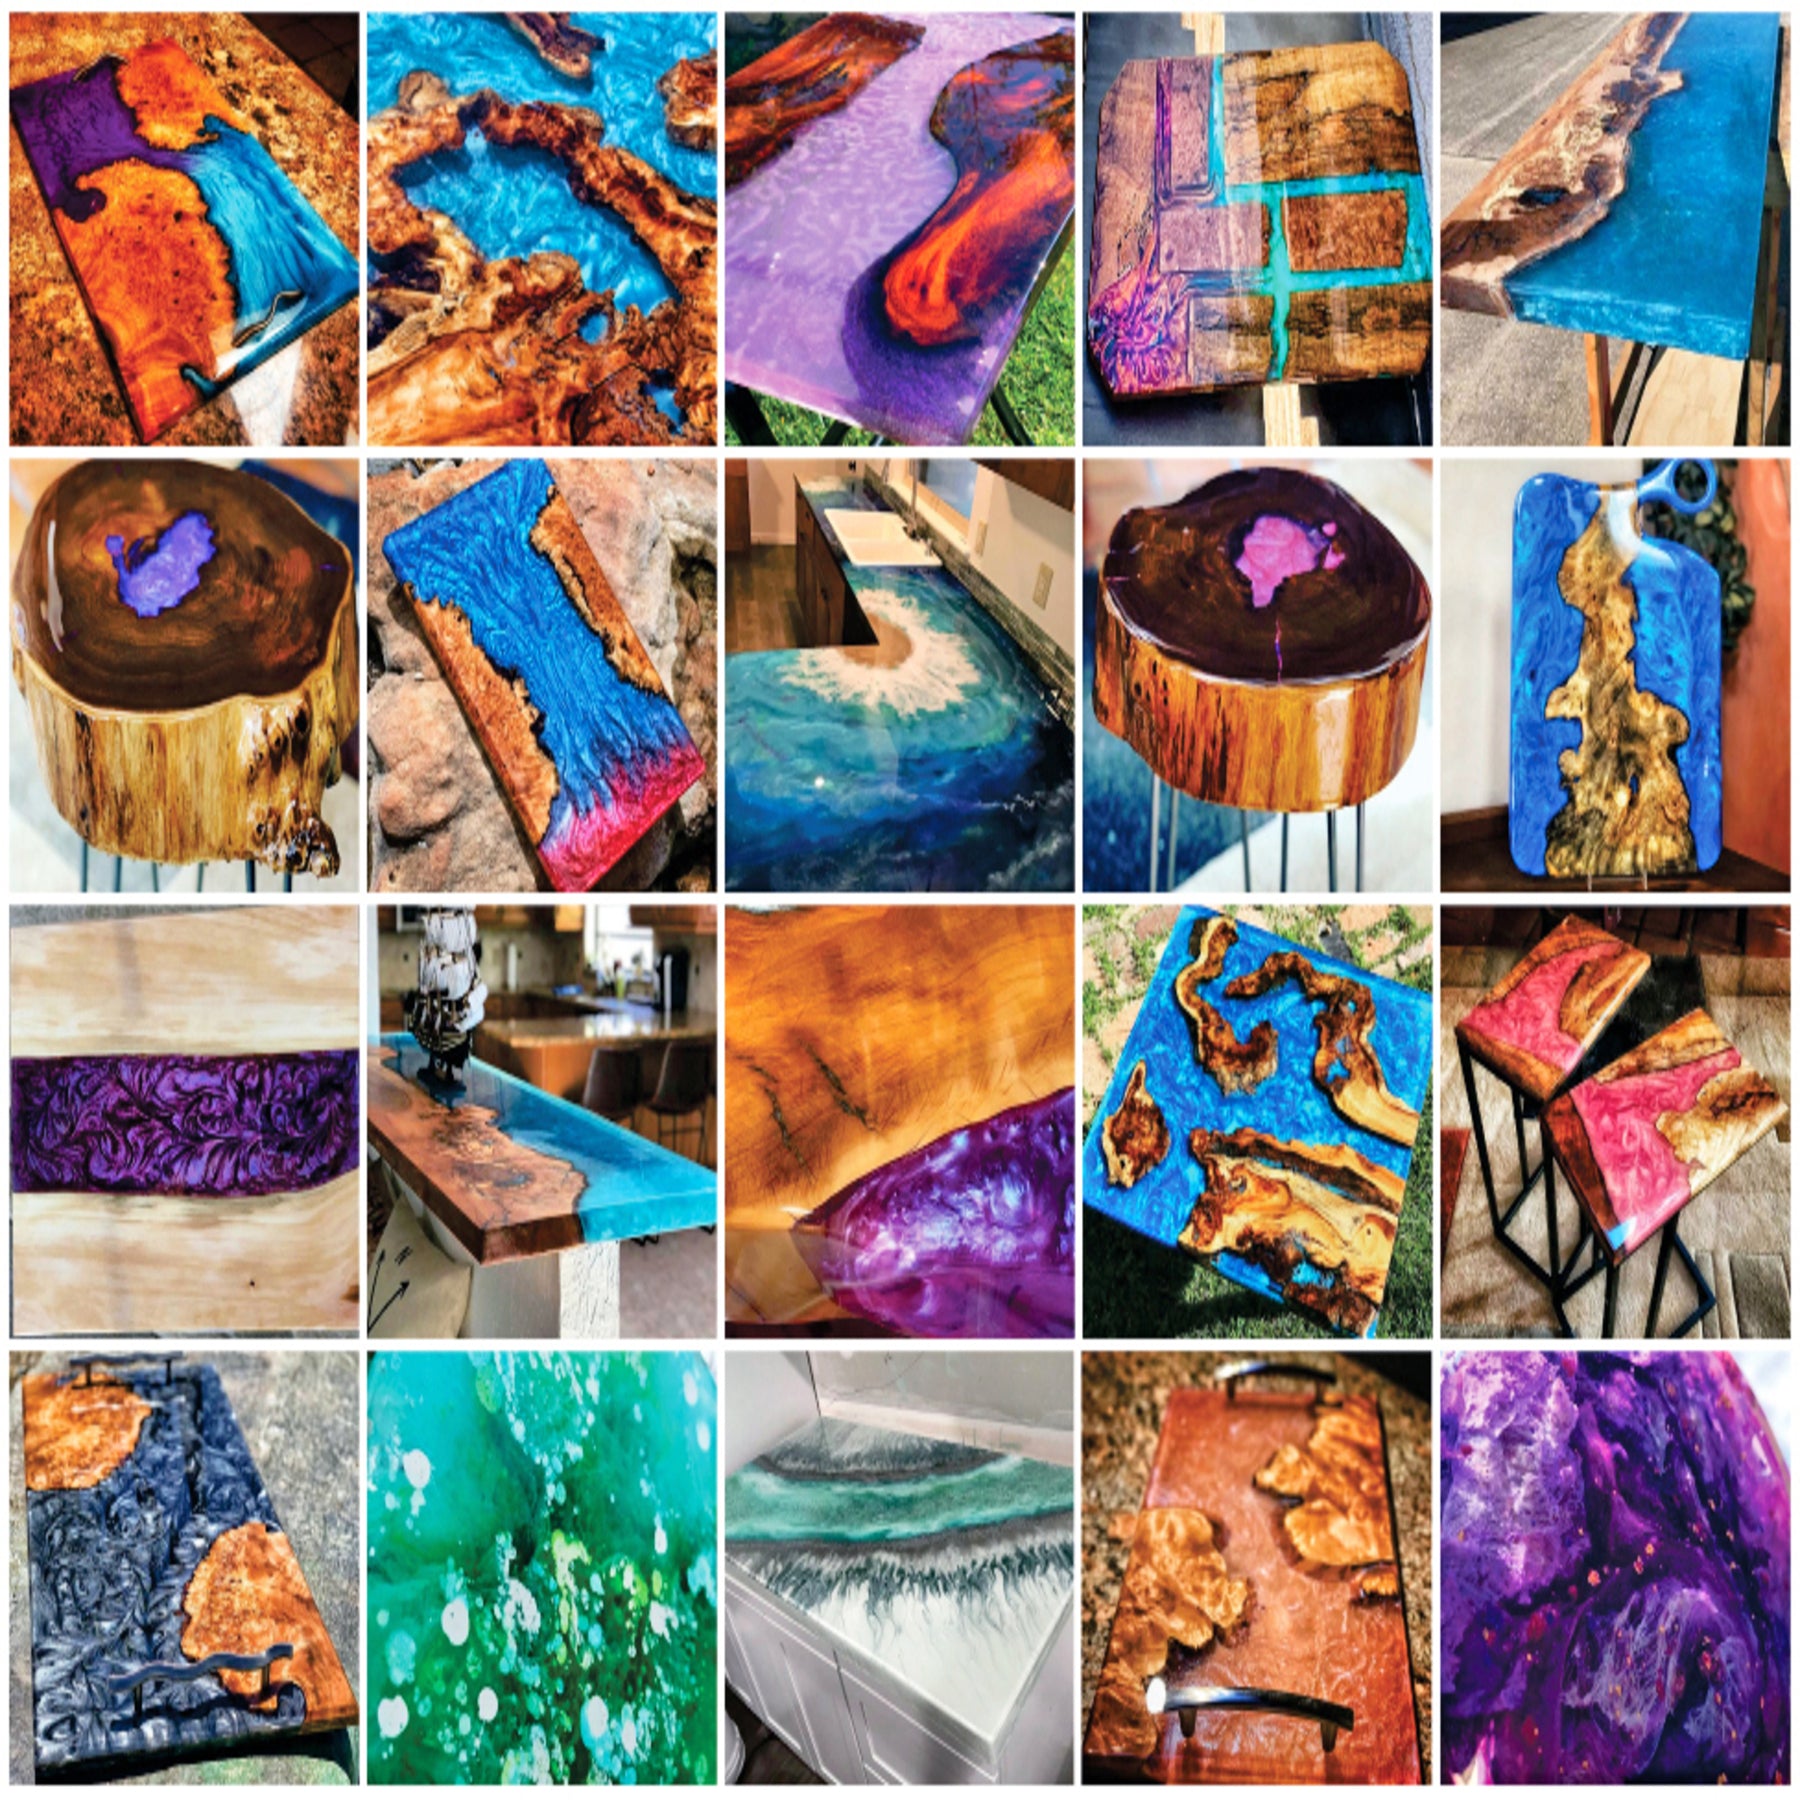
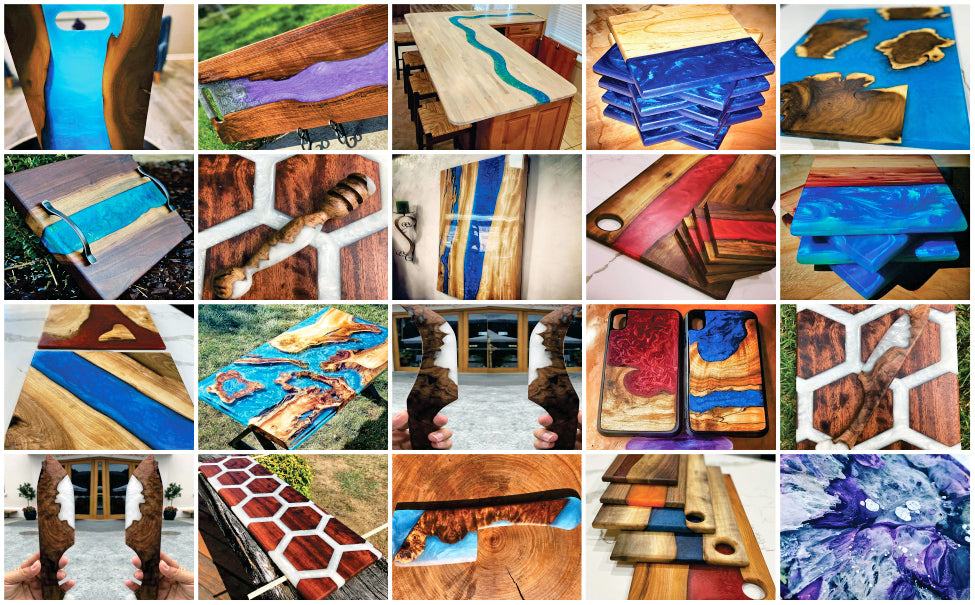
Epoxy Resin and Wood Ideas
The combination of wood and colored resin creates a perfect contrast in the Epoxy Resin Dinning Tables or Beach/River Boards. There are endless ideas in the product of an epoxy river table: from the ocean colors with beach waves to used bullets river tables, there are no limits to creativity! Jewelry making, Resin crafts and projects using metal, wood, plastic or silicone molds are easy for beginners to start! If you are looking for an idea for your next resin DIY project, then there is a best place to find your next woodworking idea!

Crystal Blue color resin river table top.

Epoxy Resin Ashtrays.

Epoxy Resin Business Card holders.

Epoxy Resin Charcuterie/Cutting board Ideas.

Epoxy Resin Phone Case DIY Idea.

Epoxy Resin, Wood and Wine Cork Idea for cutting board.

Crystal Clear Blue Epoxy Resin River Table Top.

Resin Wood Coffee Table.

Epoxy Resin Coasters.

DIY Epoxy Resin Ocean Art Cutting Board.

Deep Wood Resin Handmade River Table.

Old wood table with Epoxy Resin.

Epoxy Resin Cutting Board with Red Colored Resin.

Epoxy Resin Wood circle coffee table.
More Great Epoxy Resin Ideas for Resin furniture, Resin Crafts, Wood tables, Kitchen accessories, side tables, coasters and much much more!

All these works are made with BALTIC DAY products!
Looking for more tutorials, Tips and Techniques?
Comments
Leave a comment