FAST USA 2-5 DAYS SHIPPING
How to make a Resin Coaster - DIY Tutorial

Resin art and craft is a great hobby or work as it is something everybody can do. Resin coaster is a beautiful decorative detail for the home. Whether you create a colorful mosaic with glass tiles, embed small objects into a silicone mold, coat a slice of wood or make a petri dish coasters, it’s a super fun and simple way to be creative. I have a lot of different wood furniture in my home that needs to be protected from hot drinks such as coffee, tea or water and coasters helps a lot!
This decorative and useful resin artwork will protect your tables, countertops and will be a perfect gift for your family or friends! Making resin coasters is a very good practice for beginners, so if you are worrying if you can do this, don’t worry! In this tutorial I will teach you the exact steps how to make a set of resin coasters.

What are Resin Coasters?
Epoxy resin coaster is artwork that has been made out of resin and colored with dye. Epoxy coasters will protect your wooden furniture surface when placing hot glasses, cups or mugs. Use resin coasters as a decorative purpose or protection.
Supplies you will need to make your own Resin Coasters:
Best Resin for making Coasters – BALTIC DAY art resin
If you are looking for the most suitable resin for your coasters that will keep your artwork clear, glossy and heat resistant, then BALTIC DAY artists resin is best for your DIY projects! This resin formula is improved with the strength impact and surface appearance. It is completely safe, non-toxic, doesn’t produce any dangerous fumes, UV resistant and perfect color stability!
BALTIC DAY Crystal clear high gloss epoxy resin is very easy to tint with any resin dyes such as alcohol inks, mica powders or highly concentrated liquid pigments for unique and vibrant colors that blend and flow easily.
This resin is specially formulated for coaster projects. It has a self-leveling formula that help to provide a best quality protective coat. Once it’s cured, you will get a super glossy and shiny surface which is ideal for creating beautiful coasters.
It also has a low odor and no fumes, BPA-free formula ideal for finished projects with food contact, completely non-toxic and safe, so you can safely work with any ART projects!
Supplies you will need to make your own Resin Coasters:
- 1:1 ratio casting resin ( low to medium viscosity )
- Pigments, liquid dye, glitters, crystals, crushed stones or embed decorations such as bullets, shells, buttons, sand or beach stones
- Silicone coaster molds and release agent
- Mixing/stirring wooden sticks or resin mixer
- Toothpicks
- Mixing bucket or cups
- Torch for destroying tiny bubbles
- Protective mat for surfaces
- An empty box to cover the curing coasters
- Nitrile gloves, protective goggles, mask or respirator

Check out our more informative blog - Epoxy Resin Supplies – Beginner Supply for Resin Painting
Silicone Molds for Resin Coasters
There are hundreds of different shapes for resin coasters, you can either create your own mold or purchase a pre-shaped silicone mold. If you are beginner, I would recommend to purchase a silicone mold from your local store. If you are professional and want to create something unique and special, you can create your own desired mold shape with silicone mold making rubber. It’s easy to use with a 1:1 mixing formula. Silicone rubber is a soft and flexible to let you easily to demold your pieces.
Coaster Mold Types
- Most common coaster shapes – Round, square, rectangular, oval.
- Large and smaller multi-faceted shapes – hexagonal, octagon, 6-8sided.
- Molds with symbol shapes – flowers, hearts.
- Irregularly shaped – geodes
- Double type that provides a river or ocean effects

A Step by Step Instructions on How to make a Resin Coaster
- Preparation is a very important detail to a successful resin project. Always read the resin manufacturer’s instructions and have all materials for you artwork ready.
- Wear a protective gloves, respirator and robes. It is important to work in a well-ventilated area.
- The best working temperature is 70°F to 76°F (20-24°C).
- Prepare silicone mold by spraying it with a mold release agent.
Mixing Epoxy Resin
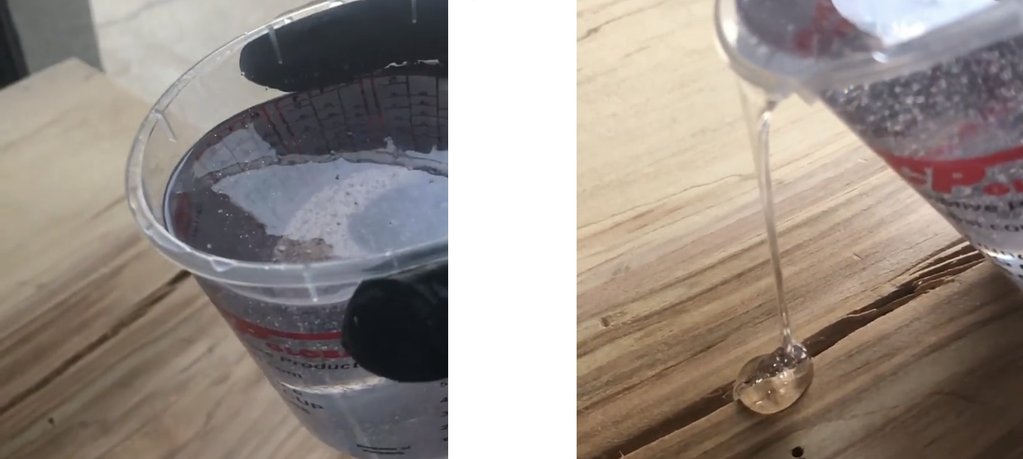
The size of your project mold will determine the amount of resin you will need. BALTIC DAY resin mixing ratio is 1:1 of resin and hardener. As an example, if your project requires a 200ml of mixture, you will need to correctly measure off 100ml resin and 100ml hardener.
Use two same size measuring bottles and pour both mixtures into a larger cup. Use a wooden stick and stir thoroughly for at least 3-5 minutes making sure to scrape the bottom and sides of the cup.
Always read manufacturer’s instructions. Most epoxy resins can be mixed at a 1:1 ratio of both components, but this can vary depending on different types of resins. There are 2:1 ; 3:1 ; 4:1; 5:1 ratio resins.
If you want to learn more about resin mixing techniques, check our article - Measuring and Mixing Epoxy Resin – Top Tips on How to Mix Epoxy ( GUIDE )
Simple Trick for a better result
Use a warm water bath – warming unopened BALTIC DAY resin and hardener in a warm water bath will change resin viscosity, make it thinner and decrease the occurring tiny bubbles. It will allow you to pour a little bit thicker than 1/8.
Note: thoroughly dry each bottle before you open them otherwise water will cause cloudiness in cured resin.
Adding color to Epoxy Resin
Once you mixed resin and hardener thoroughly, you can finally add color pigments to the mixture. Always use high quality pigments otherwise unsuitable pigments will affect the curing time as well as finished product color effect.
After you choose a coaster type, add and mix the pigment on the desired effect. Mix the color thoroughly for an even shade ( blue, green, white ) or mix few colors together to achieve certain effects.
Use these colorants for adding color to your resin mixture:
- Mica Powdered Pigments
- Liquid Epoxy Resin Dye
- Alcohol-based Inks
- Special Resin Dyes
Note: Use a high concentrated colorant. Do not exceed more than 6% of the total amount of resin, otherwise it will have a huge impact to how your resin cures. Learn more techniques about coloring epoxy resin - How To Color Clear Epoxy Resin - Best Resin Colorants for Coloring

Embedded Silicone Molds
First of all, decide what objects you would like to embed into your silicone mold. Coins, bottle caps, coins, business cards, flowers, bullets, images or other flat items are popular choices. Choose on which side these embed items will be on top.
For this coaster, we will use a bullet. Let’s get started! Pour a little bit of BALTIC DAY resin into your silicone mold. Add a small amount of resin into a separate measuring cup, drop the bullet to embed into the resin, make sure to coat the object! It will help you to prevent occurring tiny bubbles from surface. If you noticed a tiny bubbles on the surface, use a torch. Note: the flame may cause damage to your silicone mold.
Cover your coaster with a box and let it dry. If you want to embed more objects, just follow the same procedure.
There are two methods when embedding objects:
- Embed object in a single resin pour
- Create embed objects in layer ( small pieces may sink to the bottom )

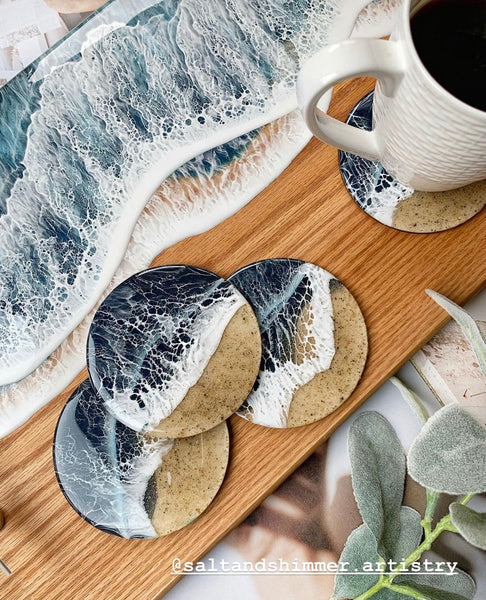
Creating Resin Beach Coasters
1. For a pair of beach coasters, you will need about 5-6oz of resin. Pour equal amounts of resin and hardener into a mixing cup ( don’t forget to wear a nitrile gloves ). Mix the mixture for at least 3-5 minutes. Pour into a clean mixing cup and stir for another few minutes.
2. Add some beach sand to a cup. You don’t need a lot, use at least 10-15 grams for on coaster. Pour a BALTIC DAY resin to the sand and mix it thoroughly until the sand is coated. If the mixture is too runny, you should add more sand, if it’s thick – add more resin.
3. Pour the sandy resin cup into the mold. Resin must have a paste consistency or the it will spread throughout the mold. Tiny bubbles will rise to the top, but don’t worry, we will have a solution for it!
4. Pour 1-2oz of resin into cup. Add few grams of colored resin dyes ( blue, green and white ). Use a stir stick and mix thoroughly.
5. It’s time to pour some of the colored aqua resin in the center of the mold and little bit of the sand resin.
6. Now you should pour some of the blue resin into the left place of the mold. It will create a deep ocean effect.
7. Pour another 1oz of resin to cup and add a small drop of white pigment drop to the resin. Drizzle over the area where the aqua color is covering the sand and make thin and vertical lines.
8. Finally! Let’s turn those white lines into sea foam! Use a hair dryer to blow the white resin. This will blend it in to the blue resin and give the beautiful sea effect.
9. the box on the coasters and let it cure for 24 hours ( box will help to avoid dusts ). It’s time to remove the coasters from the mold!

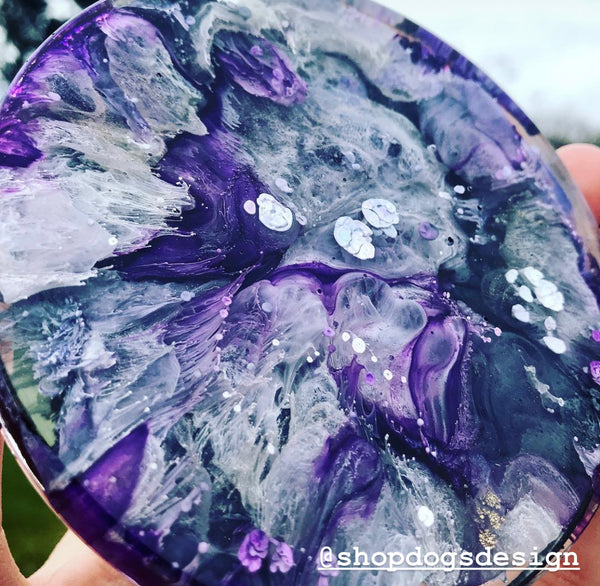
Alcohol-based Ink Resin Coasters, Petri dish
Have you ever seen a beautiful alcohol ink coasters on Social media platforms and wondered how to make them? It’s very easy!
Alcohol inks works perfectly in resin, they have the ability to push its way through the resin, creating a mind blowing, beautiful patterns and magical blooms of colors. White color alcohol ink is a main detail for stunning patterns. White ink is heavier than its colored counterparts, by dropping white ink before you use other color inks, it will drive the deep color into the resin.
To ensure the great vibrance and depth, blend them together for infinite rich effects or use their own. Alcohol inks provides endless coaster idea possibilities, achieve a beautiful sinking effect, layer, creating depth for coasters and petri dishes.

1. Measure a small and equal amount of BALTIC DAY resin and hardener ( 1:1 ratio ). Stir thoroughly for at least 3-5 minutes. ( warm up your resin and hardener bottles before pouring ).
2. Pour the resin into the centre of silicone mold to a 1/8 thickness. If resin is warmer, you can pour a little thicker amount.
3. Use heat gun to remove air bubbles from the mold surface.
4. It’s time to use alcohol inks! Drop alcohol ink into the resin, use your imagination for the beautiful color effects. It’s super simple and fun to work with. Just don’t forget to finish with a few drops of white colors, the color will sink into the resin bottom.
5. Check one more time, if there are any bubbles or dusts left, use a toothpick to remove them.
6. Cover your artwork with the box and let it dry for at least 24 hours. Remove the resin from the silicone mold.
Remove Air Bubbles out of your Resin
It is very easy to remove tiny bubbles with a heat gun, hair dryer, torch or toothpick. Once you poured resin into the coasters mold, you can easily remove all bubbles with a torch. Do not hold the torch too long in the same spot, move the heat around your mold.
Check out our article - How Do I Get Bubbles Out Of Epoxy Resin?
Curing Resin
- Once you have done your pour, resin start hardening. Don’t forget to check if no new small bubbles have developed. If you noticed any new bubbles, destroy them with heat.
- Curing time depends from one brand resin to another. BALTIC DAY resin hardens in 24 hours ( hard cure ), however you can touch the surface after 7-8 hours without it feeling sticky. Other needs 24-72 hours to cure completely.
- Cover your coasters with a small box or bag to avoid dusts and other small things.

Unmolding Resin Coasters
If you notice that the mixture is not cured completely, do not remove your resin from mold! If the resin is still bendable, flexible, by handling it at this stage, coaster may lose the shape.
Using a mold release will help a lot with demolding ( prepare your mold with a release agent before pouring resin mixture ).

Mold Release alternatives:
If you don’t have a mold release, don’t worry! There are few techniques which will help you:
- Non-Stick cooking spray
- Petroleum Jelly
- Mineral Oil
Sanding and Polishing Resin Coasters
When you are using a silicone molds, the resin coasters will have a glossy surface. Use fine-graind sandpaper and wet sand the coaster. You can also apply some resin polish with a microfiber to achieve even better results.
If you made your own resin mold, the casting may become dull or have light scratches, you will need to wet sand the coaster. The coaster is a very small object, you can use your hands to sand it out ( 120-grit ). For the larger objects, use an electric sander.
We suggest to use a water because the heat is emitted while sanding and mainly it will remove all home dusts ( water will lower the temperature ).
Once you done sanding, the surface will become flat and smooth. It’s time to polish the resin coaster with a microfiber cloth. For the unique finish, you can paint the edges with a lacquer.

Here are few Ideas for your next DIY Resin Coaster
There are hundreds of different ideas for resin coasters, you can embed anything in resin such as powder, metal, clay, glitter, stones, cards, photos, coins or even food! Imagination is endless!
Resin Coaster Ideas:
- Mica powder flakes, crushed gems and glitters
- Coins, Bottle Caps or Metal cards
- Bullets, Stones, Mosaic tile pieces
- Flowers, Shells, Sea glass, Leaves, Moss
- Family photos, Old papers, Movie tickets or Receipts
Resin Coasters with embeeded pencils

Acrylic Pouring Geode Coasters

Alcohol-based Ink Coasters and Resin Petri-dish Coasters

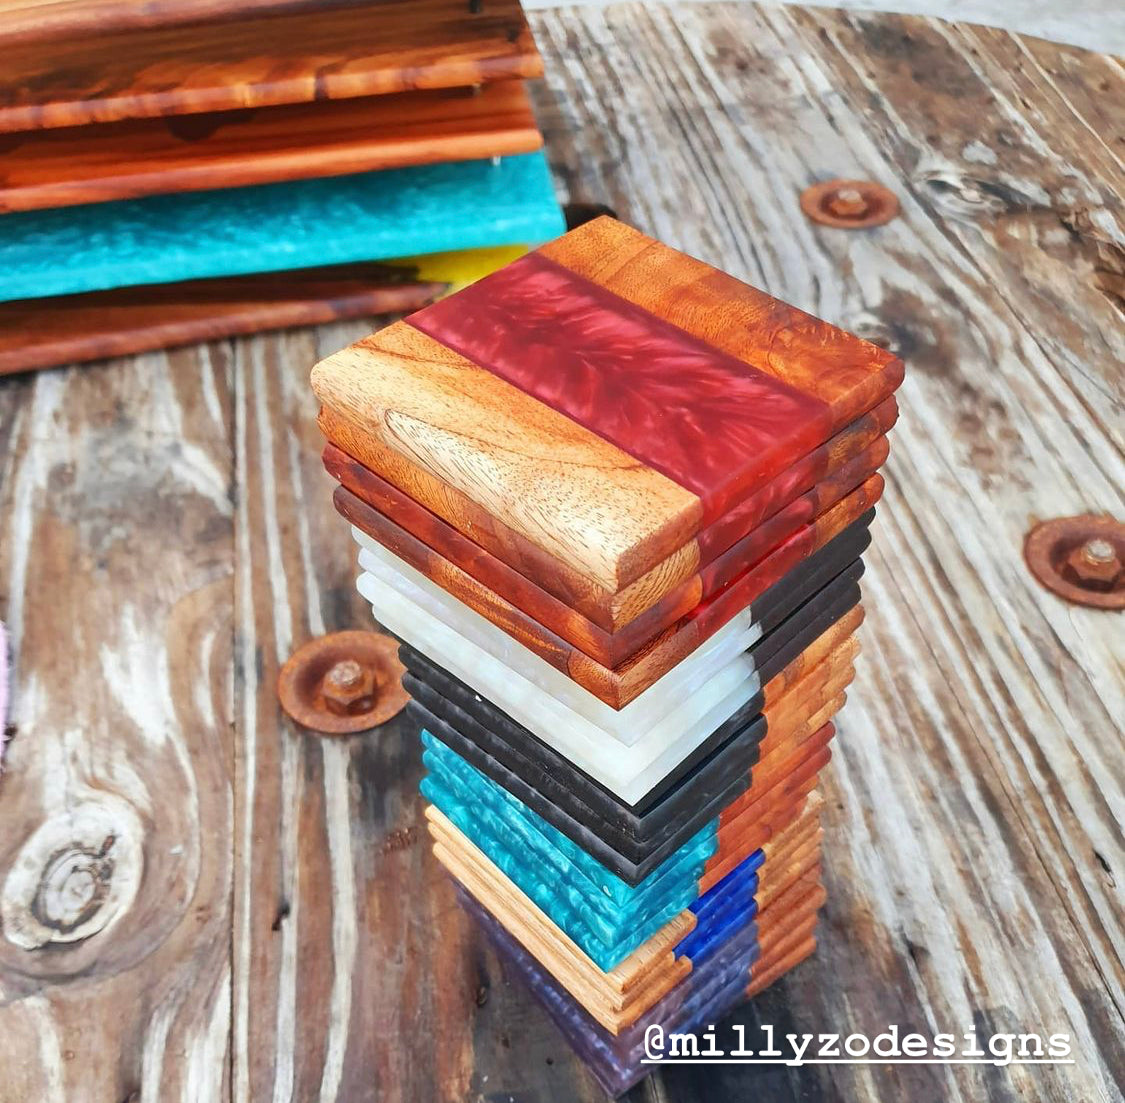
Wood and Resin Coasters
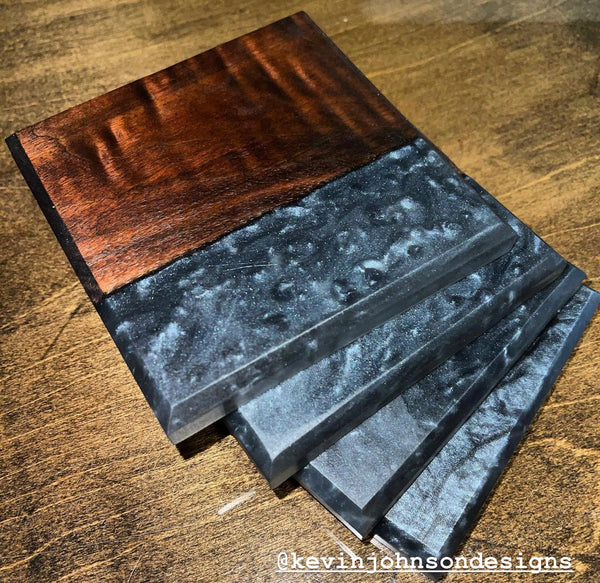
River Epoxy Coasters

Natural Piece Coasters

Coasters with Embeeded Objects

Colored Resin and Wood Coasters

Ocean Beach Resin Coasters
Sea Foam Coasters

Transparent Resin with Black Color Coasters

If you are looking for more resin and wood ideas, check out our helpful blog - Tutorial for Creative Epoxy Resin Ideas and Projects with Wood Epoxy
We hope this article – how to make a resin coasters guide – has helped you to how easy the process of making epoxy coasters can be. Follow these recommendations to achieve results that you want!
Which type of coaster from this post are you most excited to make?
Share your thoughts by leaving a quick comment.
Leave a comment