FAST USA 2-5 DAYS SHIPPING

How to Make a River Table with Wood and Epoxy Resin – Step by Step TUTORIAL

Epoxy resin river table is stunning and outstanding part of the home design. You‘d like to make one of this unique “river” model table but don’t know how? In this tutorial we will show you a step by step guide – how to make your own resin river table! With the right directions, this isn’t as difficult as it looks like! Follow these simple instructions and tips to create your first river table!
What is Epoxy Resin River Table?
An Resin River Table is a unique furniture which is made with Resin and Wooden planks. The Idea to produce eye-catching table came from the United States, the past few years this idea spread over all the world! Outstanding table design looking luxurious, modern and radiates emitting energy. This resin wooden table will look amazing in your office, living room, apartments or your work space - restaurant.
So let’s talk about the contrast throught the combination of wood and dyed resin. The special thing about these pieces of furniture made of resin and wood is each person can decide which color river table he want to. There is no such thing as same wooden tables from the factories and shops. Each river table is unique with different design details such as neutral color scheme, eccentric looking in strong colours. In crystal clear river tables you can add different things such as bullets, cards, money, leafs, sand or photos. The imagination is endless!

These Tables are made with Baltic Day pigments by @letswood.ua
What Materials and Tools do I need to build Live Edge River Table?
Decide what type of river table and size you want to make and choose the right materials from this list. Some tables are cheaper than others as an example coffee tables. Don’t think that you must have all products on this list to make a beautiful epoxy resin table.
- Epoxy Resin
- Fast Drying Epoxy
- Baltic Day Epoxy Resin Color Pigments Kit ( For Colored River Tables )
- Transparent Liquid Color Pigment Sample Pack ( For Crystal Clear Tables )
- Natural Wood Live Edge Slabs ( Must be well dried )
- Caulk
- Mold
- Caulking Gun
- Silicone Spray
- Tape Screws
- Table Top Finish Wood Oil
- Propane Torch / Heat Gun
- Mixing Bucket
- Wood Chisel
- Screws
- Sandpaper
- Orbital Sander / Polisher
- Circular Saw
- Corded Drill and Paint Mixer
- Plunge Router
- Paddle Mixer
- Pollishing Paste ( for glossy surfaces )
- Nitril Gloves
- Eye Protection Glasses
- Respirator or Mask

Choose The Right Wood for Your River Table
Choosing the wood is a very important factor to produce beautiful epoxy river table. It’s worth to buy more expensive natural wood for your artwork. It’s better to make a high quality and long lasting table than a cheap and poor quality furniture which can broke very fast.
For the epoxy resin river tables, you should choose a wooden board that is natural or board made of a tree trunk ( at least 1.5 – 1.7inch thick ). The look of your project will look very attractive if the piece of wood has naturnatural edge barks. There are a lot of different stores where you get raw wooden boards from a wood dealer, furniture manufacturer, carpenter shop or even internet. You can also simply buy two beautiful wooden boards from DIY store which are slightly curved shape on one side and jigsaw into your desired shape. Before starting working with wooden boards, don’t forget that the wood must be 100% dried.
Wooden Boards Preparation
- It’s important to dry wood carefully, the moisture content should be less than 11-13%.
- Both Wooden pieces should be cut to the same length and the size edges. Saw it with a circular saw in the middle or ask a professional carpenter to do this.
- Use Planing Machine - If you have experience in working and processing wood, you could use planer. Make sure both wooden parts have an even thickness and be absolutely flat.
Note: It’s worth to invest more money into materials. If you want to build a fine good-looking wooden table to yourself, you will invest a lot of time and effort. It’s recommended to buy a beautiful and highest quality wood from the woodworkers or trustful stores.

Working with Epoxy Resin Conditions
Epoxy resin is a very sensitive material, when mixing these components – Resin and hardener will prompt a chemical reaction, transforming them from a liquid mixture into a solid. The ideal working conditions must be created before working with resin. Temperature, humidity and cold are factors to your project success. Hot temperature may affect the drying time of the resin – it will cure faster. While the resin reacts sensitively to remperature, it is very important to know the right working temperature. The ideal processing temperature is 23-30C or 70-85F Celsius. Cold temperatures below 20 degrees or 68F will cause mixture to become very thick with full of bubbles.
If you store your resin kit in the cold space, tiny, unsightly bubblies will quickly show in the resin. These micro bubbles will not be removed easily, the propane torch or hot air dryer will be the bubble-free solution.
A dust-free, dry and well ventiliated workshop area is also very important factor for your project success. Small dusts may occur when resin begins to harden.
Tip: Check out our helpful blog - Measuring and Mixing Epoxy Resin – Top Tips on How to Mix Epoxy ( GUIDE )
Bark Removal and Grind the Wood
The bark on the wood, big knot holes, rotted spots or other remaining bark must be thoroughly removed. You want to make your table as clean as possible with no hard, soft or rotted wood. Sand the edges by hand with sandpaper or a simple tool – chisel or hammer.
Clean up slabs with a stainless wire wheel, it removes all the soft wood and keep the hard wood. This will allow the epoxy resin to bond better with the wood later.
Use eccentric sander or orbital sander for the larger surfaces. Start with 80 grit and work up to 220 grit. After each use, remove all the dusts. The wood must be cleaned completely from all the dust residues. Use vacuum cleaner and finish with a microfibe cloth to get rid of all the dusts.
Filling Bumps and Cracks and Sealing the Wood
All uneven area and porous cracks should be filled with epoxy resin. These can be filled with a unpigmented crystal clear epoxy resin or colored resin. Seal the edges with a very strong and stable adhesive tape to even out any unevenness in hard to reach areas at the edges. This will stop resin from running over the edges.
We always recommend to seal the edges with a fast drying resin. It will prevent any staining that can happen from dyed mixture penetrating wood. When the cracks completely cures, seal all the wood with transparent resin. It will generously coat the entire wooden surface including surface. This small detail will prevent the wood from gassing. Let it dry after sealing for atleast 5-6 hours in 17° to 24°C.
After the whole mixture is completely cured, slightly roughen the inner edges, which will later contacts with the cast resin. Slighthen by hand with a sandpaper, the epoxie will bond better with the edges. Use silicone glue brush or a fiber brush. Simply slather it all over the edges that will be touching resin.
Choose your Mould Layout for the Resin Tabletop
While starting any project, we always build a template to help us visualize the end result. It’s don’t have to be very special, you can use a simple 1x1 scrap. You can move your template around or play by moving and flipping your slabs, adding into other pieces to see how it looks like.
Another option would be a mould built from MDF boards in the length of wood and size of tabletop. The process must be taken carefully and accurately measured. You don’t want to create a bad looking mold. 14-16mm MDF boards on the bottom, sides at pray and 10-12mm higher than the tabletop. The side panels are fastened or glued together with a special hot glue.
Once you built a mold with MDF board. It’s time to clear sanitary silicone to seal the edges. This work must be done precisiously to ensure that the mold form is 100% tight otherwise mixture will leak out around the corners.
Now apply a release agent in the finished mould. Carefully release the table top from the mould without making damages. Resin could adhere to the MDF boards after drying and ruin your mold. Use liquid release wax or glue the mold with adhesive and protective tape to cover around the entire mold. Another option is to spray silicone or Teflon spray. Work surface where the mold is placed must be in balance!

Place the Wood Slab into the Mold
Once the mould is finished, you are ready to put the wood into the mould. Insert the wood into the position you want in the finished table and fix it with parallel clamps. Don’t forget that mold must be 100% in the balance otherwise the resin may leak. To ensure that components will not float during the first pour use weighted items. For the smaller river tables, you can use a heavy items such as stone or workout dumbbels.
Keep in mind that all the fixed parts will contact with the resin. The first layer of colored resin will secure the slabs in place once it starts to cure, you don’t need to screw the slab to the mold. We always recommend to apply a silicone barrier to the wood along the edge of the river to prevent the resin from being present on on the entire table. Don’t pull the barrier to close to the edge, use atleast 0.8 - 1cm (0.4 - 0.5inch) or 2 - 2.2cm (0.8 - 0.9inch) distance along the inner edges.

Mixing Epoxy Resin Thoroughly
Measure and calculate the right amount of epoxy resin for your project. Baltic Day resin is 1:1 ratio, add approximately 2 spoons of color pigments per cup and mix thoroughly for atleast 5-7 minutes. Use a sufficiently large bucket for the total amount of resin.
Keep in mind, mixing with a drill attachment the more air bubbles will whip while you mix. However mixer will ensure the optimatl mixing of the components. Once epoxy is mixed thoroughly, wait 6-10 minutes to allow air bubblies to rise to the working surface.
Baltic Day epoxy resin color pigments are specially formulated for Resin River Tables.
Recommended quantity is 1g pigment per 1-5oz of epoxy, depending on how saturated color you want to get. Keep adjusting the amount of pigments added into the mixture until you achieve your goal. Create resin color combinations while adding different colored epoxy paint. Do not exceed 6% colorant to the total volume of Baltic Day as this will affect the delicate chemical balance needed for the reaction to properly used.
Casting resin in 3 or more layers. Resin is very hot at a certain thickness. If the resin boils too much, it becomes cloudy. Pour epoxy resin mixture into the mold and wait 8-15 minutes. Use a propane torch to remove bubbles from the surface.
Note: how many layers you need depends on the thickness of the table top ( follow manufacturer’s instructions ).
Once you have bubble-free surface, create your own pattern using a mixing stick. After 30 min epoxy starts to gel, then resin should be sticky consistency. Swirl and apply the heat one more time, cover your piece of any dusts.

How to Make Resin Patterns or Swirls?
Use colored paint to do that. Use resin paint to color extra resin, then use that colored resin to create the swirls. It’s fun to do that because you can create a interesting pattern for your base layer. When casting a water effect look, colour the larger part of the resin with epoxy resin color pigment – metallic.

Making Crystal Clear Epoxy Resin River Table
Start with carefully pouring the first layer of transparent resin into the epoxy resin and apply the surface with a torch or heat gun. Don’t overheat the resin for more than 4 seconds, otherwise resin will start to yellowing.
Once the first layer is not completely cured, feels like sticky tape, pour the second layer. Don’t wait till first layer will cure completely otherwise second layer may not bond correctly with the first one. If you waited too long and first layer cured, then sand it with 200-220 grain sandpaper, clean the entire surface and then pour second time.
It’s time to make our river table unique with embedded objects such as images, bullets, corcks, leafs, stones, fishes or any other items you wish. You can only do this in this stage otherwise the objects will sink.
Pour one more layer of resin above the edge and let it cure completely.

Mold Removal from the Epoxy Resin Table Top
It’s time to demold our table top! Remove all screws, parallel clamps and carefully take off table top from the mold using a plastic hammer.
Sanding Tabletop Surface
After ground the table top with hand or use an orbital sander/eccentric grinder. Use 70 grit and work up to 400 grit. Before sanding use a router to get a smooth edges.
Finishing, Sanding and Oiling River Table
To achieve a perfect look of river table, you must protect the wood. Finished river tabletop must be polished very well with a polishing paste. Use wood oil to achieve a natural and matte look. Use a cloth or plastic spreader to apply over the entire surface.
Let Epoxy Resin Cure
Once you eliminated the entire surface bubbles, you can finally cover the table top with a cover that will protect from dust settling while it cures. Do not touch the epoxy resin with the cover, make sure that there is enough space otherwise cover material may touch the curing resin.
After 12 hours the epoxy resin will be cured, fully cured after 6-7 days. Make sure it’s been 7 days since you finished your artwork. Don’t test the surface with a light objects on it, it will result scratches on the surface. Now it’s time for a table base! Choose your table legs, these can be made of the same wood or unique and stylish metal table legs.
Epoxy Resin River Table with LED lights
LED lightning can be molded into the tabletop. It’s easy! When casting resin, keep in mind to mixture temperature. Resin can’t be too hot otherwise the LED lighting will melt. Always use a very high quality LED lights, connectors must be fixed well so you can connect them easily afterwards. You can’t change LED lights after casting.
Glossy and Shinny look with Baltic Day Crystal Clear Resin
If you a prefer glossy look, you can coat the river top with crystal clear epoxy resin. First apply the adhesive tape around to prevent the resin from dripping down. Now spread the resin with a plastic spatula or spreader. Remove all the bubbles with a hot gun. Pour the second layer of resin and let it cure. Remove the adhesive tapes around the sides.
So How Much Does a River Table will cost to you?
If you will build a river table by yourself, the most expensive products are the Wood and Epoxy Resin. If you are woodworker and have all the tools, you can finish table piece for 350-450 USD. If not, the River table will cost probably from 1500-5000 USD depending on the table size.
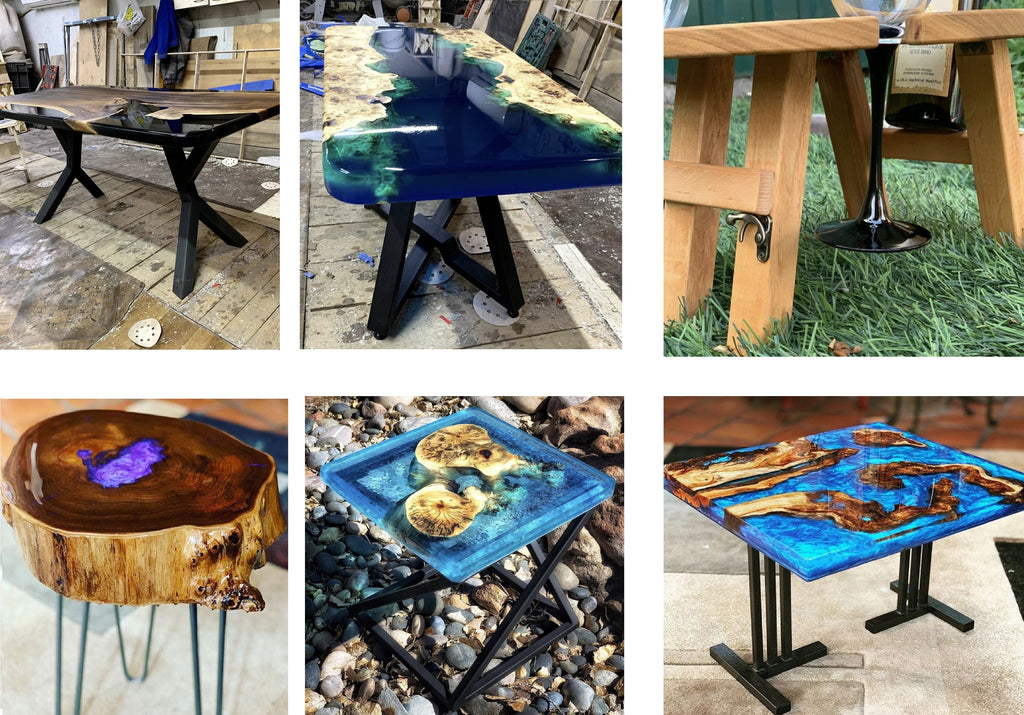
Here are few DIY Epoxy Resin River Table Ideas for your next Project.
River Dinning Table with Blue colored Resin and Live Edge Wood

Coffee and Side Table Designs

Pearl White Resin Table and Outside Garden Table Design

Office Room Table with Crystal Blue Color River

Geode Resin Round Coffee Table and Resin Table with Embeeded Rock Objects

Looking for more tutorials, Tips and Techniques?
- My Resin is Tacky – How do I harden Sticky Epoxy?
- Measuring and Mixing Epoxy Resin – Top Tips on How to Mix Epoxy ( GUIDE )
- Is Epoxy Resin Food Safe?
- How to make Epoxy Resin Cutting Board?
- How To Color Clear Epoxy Resin - Best Resin Colorants for Coloring
- How Do I Get Bubbles Out Of Epoxy Resin?
Share your thoughts in the comment below!
Comments
Leave a comment