FAST USA 2-5 DAYS SHIPPING
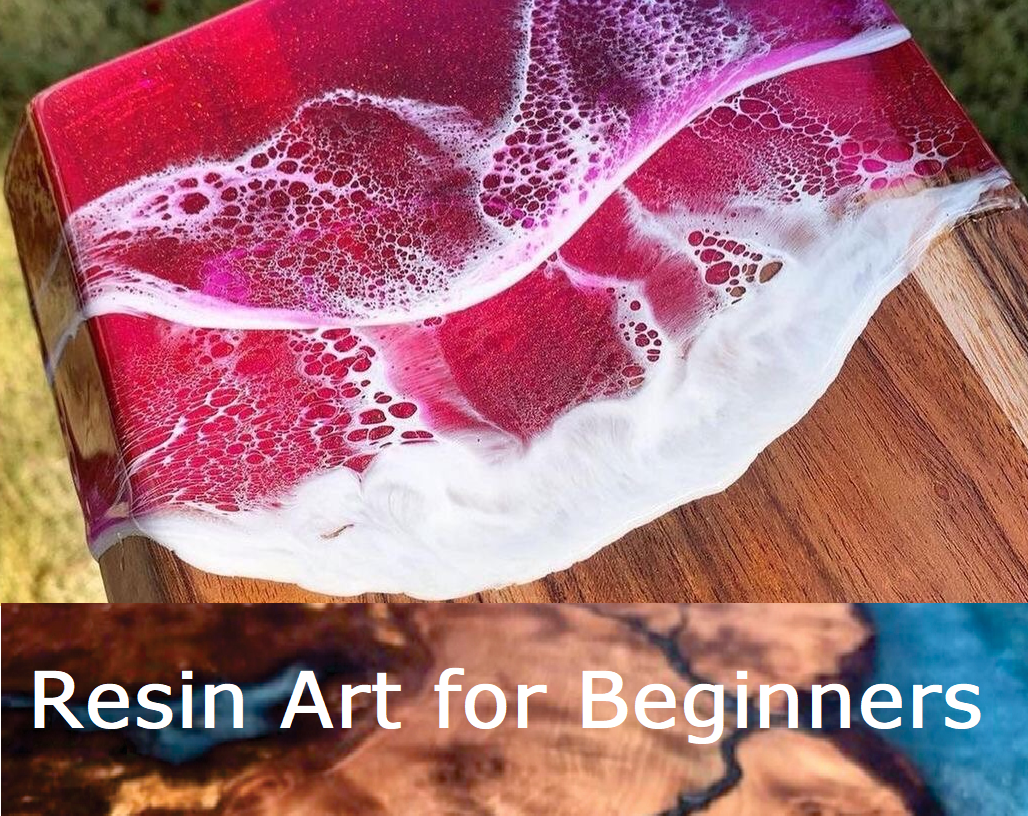
Resin Art - Things You Should Know as a Beginner

These days epoxy resin craft is becoming more and more popular. This cool and fun artist trend is visible everywhere! Resin is an interesting craft that lets you produce beautiful items that have a similar strength of the material to glass or plastic. However, it’s not that hard to create resin crafts as glass or plastic crafts.
If you are an artist and like creating small gifts to family or friends, resin crafting is an ideal choice for you! With resin you can make almost everything, from jewelry such as keychains, necklaces, rings or bracelets to coasters, tumblers, trays. There are many resin color additives to color resin, from transparent, translucent to solid opaque or metallic effects. You can also add small objects to the resin such as dried pressed flowers, glitters, flakes so it’s very comfortable to work and match your taste.
 Above: Baltic Day Mica powder used with epoxy resin and wood
Resin crafting ideas come from the variety of molds that are available online. Today, you can find almost any form of mold: sphere, round, pyramid, cube, square, rectangle, coasters, tray and much more! You can even make your own mold with a silicone rubber. No special skills required, just simply mix part A and B together and stir the silicone rubber for 5 minutes.
Resin craft is a good hobby that can become your professional work. I have been working with resin for over 10 years now and every time I am super excited to de-mold every resin piece over and over again! It’s exciting to peel off a mold and see your beautiful resin craft creations!
From the first look, resin can look difficult to work with, but don’t worry! What materials should you buy? It’s not as hard as it looks! What supplies do you need? What projects and creations can you make with resin? It's a super expensive hobby? In this tutorial, I will share with you the best tips, tricks and techniques to get you started.
What is Epoxy Resin?
When we are creating art of crafts, we’re referring to epoxy resin. Resin is a clear liquid plastic made out of two parts: resin and hardener. When materials are mixed together, they react and produce heat. This chemical reaction occurs that creates from a liquid to hard as rock solid material. The ratio of this material usually is 1:1 and it’s easy to work with!
It’s very important to follow the resin manufacturer’s instructions otherwise resin will not cure properly. You can measure resin by weight or by volume. In fact, resin and hardener have different weight, it’s not the same as it looks like.

Epoxy resin was used for many industrial applications for fixing leaks, repairing broken boat parts, sealing worktops. It has been used for many years for applications as wood tables, flooring and building purposes. That is, until artists and crafters discovered that a clear and shiny coat of epoxy resin makes colors pop in artworks, giving paintings a deep shades of depth for finish.
Resin allows us to use it for items such as home décor, pictures, jewelry, sculptures, coasters, flow art, charcuterie boards, trays and other works.
Looking for more information? Check out our article – Is epoxy resin food safe?
There are many different types of epoxy resin to choose from. Different composition resins are for different uses: river tables, flooring or resin art. Here are a few things to consider before purchasing epoxy resin.

What Type of Resin Should I Choose?
When you’re starting working with resin, you might think to try and buy the cheapest epoxy you can find. The fact is that most cheap epoxy resins are not designed for resin craft: usually they are made from the cheap materials, are highly toxic, give fumes and start yellowing over time, ruining your craft work. For the quality of your artwork, it’s worth it to pay more for a better quality resin.
Resin viscosity – things you should know.
- Low viscosity resin has a longer curing time, so you will need to wait some time before demold your work. This type of resin can be used to cast thick or large layers of resin.
- High viscosity resin has a shorter working time results in a shorter curing time.
So it’s very important to choose the correct type of viscosity, otherwise you could end up having a project that won’t cure completely and look terrible! As an example if you will use a low viscosity resin for a large object, you may not be able to get the resin out of the mold and the project will be ruined. If you use a high viscosity resin in a different mold, it might look broken. Always take some time to look deeper for a good quality of resin.
Resin Working Time
Most epoxy resins have a short working time, around 25-30 minutes. This time you can work with resin after mixing it before it starts to harden. I recommend mixing small batches of epoxy resin, because it’s a very short working time.
Resin Curing Time
Curing time can vary depending on the resin supplier, so make sure to double check the manufacturer’s instructions. Weather conditions, working temperature and other factors also impact. Usually, resin cures completely in 24 hours.
Resin is Heat Resistant?
Projects that come into contact with heat, such as coasters, trays, you need to check if your epoxy resin is heat resistant. The curing time for this type of resin can be longer than other types.
Thickness and Depth
Each brand has a different product composition suited to different pour depths. Your resin won’t cure fully and remain tacky if you pour resin to a depth thicker than that which is recommended.
The maximum single pour depth will affect the type of project that the epoxy resin is suitable for.
Is Resin Food Safe?
As we mentioned before, not all epoxy resins are food safe. If you are not sure if your resin is safe, contact with the manufacturer. If you are looking for more information, read our article – is epoxy safe?

How Do I Mix Epoxy Resin?
Mixing resin can be quite difficult for beginners but once you get into the process and doing it over and over again, the steps are very easy: mix, pour, destroy bubbles, layer resin, wait till it cures. We have a whole blog, Measuring and Mixing Epoxy Resin, that explains each step in detail.
Why It’s So Important To Use High Quality Baltic Day Resin for your Art Projects:
Easy to Use 1:1 ratio: There are no confusing instructions here, you don’t need to weigh each part. Baltic Day art resin is a 1 : 1 ratio, measured by volume. Just simply mix together both parts, resin and hardener together in equal amounts. That’s it!
Specially Made for Resin Craft Art: Baltic day a thick consistency, which is easy to control when you are working with it. It allows self leveling as the resin hardens completely. The thick consistency resins are ideal for color separation in flow resin art. It has 40 minutes working time, so your art piece will cure in a short period of time ( completely cures in about 24 hours ).
Crystal Clear Formula: Baltic Day resin was specially designed for a glossy and shiny finish. Non yellowing formula will keep your art looking good for a very long time.
Completely Safe: It’s very important to work with a health safe epoxy resin. Baltic Day art resin is non-toxic, contains no solvents, fumes or VOCs and has no harmful ingredients ( must be used as instructions ).
Use Epoxy Resin Safely
It’s important to use epoxy resin safely. Follow these basic safety recommendations to work safely.
Work in a well ventilated area – use PPE, nitrile gloves and a respirator. A mask or respirator will give you the best protection from fumes or solvents that are produced when mixture starts to cure. If you notice any allergic reactions, stop immediately!
Personally, I wear a respirator, long sleeves, nitrile gloves and special pants to prevent any contact with resin.

What Resin Craft Supplies Do I Need?
Epoxy resin can be used for many different crafts but most commonly it’s used for making jewelry, accessories and home décor. Once you choose a mold, it’s up to you what type of project you will do. From keychains, necklaces, rings, bracelets, charms to bookmarks, earrings and other.
No matter what artwork you are making, there are few supplies you’ll need. As you have some experience, you can start by adding resin tools like colorants ( natural transparent ) with mica powder pigments, alcohol inks, airbrush colors, liquid color dyes or universal tints. Then you can start adding some dried flowers, glitters, flakes, gold leafs, 3D inclusions or beads to your resin.

Which Painting Ground Surfaces is the best base for Resin Art?
Painting surfaces suitable for resin art are made of wood, metal, glass, plexiglass or concrete. Absorbent surfaces are not recommended, they are unsuitable.
Painting Grounds suitable for Resin Art:
- Canvas – when working with larger resin art projects which require a lot of resin, it’s important to support the surface to prevent the resin from pooling. Slip some thick cardboard behind the canvas against the frame, so the canvas has less chance to sag.
- Wooden Panels – they are solid and do not sag. Wood panels rarely come primed, so you will need to prime your surface before your projects.
- Tiles – they are ideal for small projects such as coasters. For larger projects, you need to prepare your own tiled surface. White tiles are cheap, you can create art boards that don't need priming.
- Medium density fiberboards ( MDF ) – it’s a good alternative to panels or canvas as they all have similar benefits and are cheaper.
- Vinyl – Vinyl records are not used often for resin art. However, they are great for small or medium projects. Make sure to tape up the central hole before starting your projects.

Where Can I Find Resin Molds?
Different works require different molds. It’s very hard to make a beautiful resin piece without a silicone mold. I’ve found a local silicon mold at craft stores and online stores.
A lot of these silicon molds are made for food purposes, not for resin. However, you can still use food-safe silicone molds for resin. It will require extra work because the finished piece may need to be polished as food molds are something rougher than resin molds.
Do I have To Use A Mold For Resin Crafts?
Now you know where to find molds to purchase. But do we really need it? The answer is simple, NO.. You don’t need to!
You are able to pour resin over things like cutting or charcuterie boards, canvas painting, coasters and other items. For 3D pieces, you will need a mold.

The basics you’ll need when working with epoxy resin:
- Baltic Day Epoxy Resin
- Measuring and Mixing Containers
- Nitrile Gloves, Respirator, Stirring Sticks, Spreader
- Resin Molds
- Toothpicks: to take out dusts from artwork
- Silicone Mat: protective cover to protect your work while it cures
- Torch or Heat Gun: to remove bubbles

Optional Resin Tools
Epoxy Resin Colorants: use colorants made for resin, like our Baltic Day epoxy colors
Alcohol Inks, Liquid Resin Dye: for making coasters or petri dish
Silicone Molds: for making jewelry, coasters or trays
Inclusions: Glitters, Dried Flowers, Gold Flakes, Shells.
Plastic Stands: to prop work up off of your working surface
Plastic Tape: to catch drips of your resin piece
Small Cups for Smaller Projects: for mixing small amounts of resin tint
Heat Gun or Hair Dryer: to make heat waves on your artworks ( flow art )
Want to learn how to color epoxy resin? Check out our blog - How To Color Clear Epoxy Resin - Best Resin Colorants for Coloring
Coloring Epoxy Resin
Adding colorant and embellishments to resin is the most satisfying thing about this craft. Experimenting with different colors and techniques is my favorite! Alcohol inks, resin color pigments, glitters or flakes are so fun to do!

When it comes to resin craft, there are two options: clear resin or not clear – colored! That brings a question of how to color resin?
There are plenty of different options but I’ve found mica powders or alcohol inks to be the easiest solutions. Alcohol inks are more transparent in color but mica powder has a metallic shiny effect. These powders will give you a truly opaque look! Each colorant has its own pros and cons.
Epoxy Colorant:
- Mica powders
- Alcohol Inks
- Liquid Pigments
Mica Powder Pigment
Mica powder has a special shiny effect that makes it possible to be very fine. Usually it is used in cosmetic, soap, bath bomb making industry to color products such as nails, eyeshadows, lip balm, gloss, soap, bath bombs.. This type of colorant is ideal for coloring resin!

When you add micas into resin, you need to mix it thoroughly for at least 5-7 minutes to ensure it’s not streaky and doesn’t have any clumps.
Baltic Day Mica Powders are specially formulated for resin craft projects.They do not fade or tarnish in color over time unlike other colorants. Pigments will not bleed or bloom unlike other inferior colorants. BALTIC DAY pearlized pigments are specifically designed for Epoxy Resin Projects.

Mica powder used with epoxy resin and wood, by @refinednaturesantafe
Alcohol based Inks for Resin
Alcohol inks are another great option to color resin craft pieces. Inks can be dropped onto pored resin and combined with “sinking” color effect ink, they can produce amazing colors and patterns!

This colorful coaster was made using clear resin with alcohol ink dropped into it by @shopdogsdesign
Liquid Dye for Resin
These epoxy pigments in liquid form are mostly used for resin jewelry craft. They come in small 10ml bottles with droppers. Usually you need only a few drops to achieve translucent color. They are ideal for making pieces where you want the light to shine as an example: resin necklaces or earrings.
If you want to create opaque resin craft, add some white and mix with the chosen color.

Baltic Day has a huge assortment of different resin pigments. These dyes are in powder form and come in jars or bags.
How to Calculate the Amount of Resin you will need?
How much epoxy resin you will need for your projects depends on the size of your painting surface, also the size of the edges which you want to cover with paint tape. Once you’ve prepped your working surface and determined how much resin you will need, pour equal amounts by volume of resin and hardener into the mixing bucket.
Let’s say your artwork project size is 1 feet x 2 feet ( 12'' x 24'' ). Total combined epoxy resin required is 10oz: 5oz of resin and 5oz of hardener. Test by starting pouring 5 oz of resin into the mixing cup, then 5 oz of hardener ( total 10 oz ). The BALTIC DAY 16 oz kit is the perfect amount you will need.

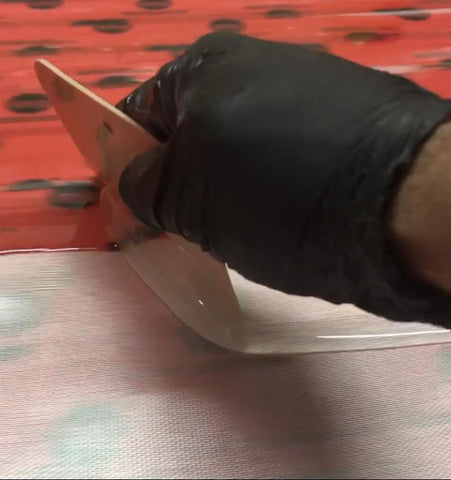
Resin Art Technique – Create Cells in your Resin Art
Ocean cells can be produced by casting technique, it's similar to dirty pour or air swipe art. Produce cells by adding some isopropanol alcohol, Resi-Blast or Alcohol ink. Simply drop the few drops of Resi Blast into your poured resin ( should be dropped as soon as possible otherwise resi blast will have no effect ).

Create Glowing and Sparkling Resin Painting Effect
Add some glitters or crushed crystals and stone to your epoxy art and you can set amazing and eye-catching accents. As an example, geode resin artwork is made from resin, crystals, paint, glitters, stones and other resin supplies. The final result is incredible! It looks like an actual geode found in nature.

Tutorial for Creating Resin Painting – How to make Resin Art for Beginners
Once you decided what type of project you will do, choose colors and size, you are ready to do your first epoxy resin art:
- Make sure your workplace is a clean and well-ventilated area. Lay protective cover on the working surface and floor.
- Use strong paint tape on your painting ground, colored resin drops on the underside of the work can be removed easily. We also recommend sticking to the side of the painting ground. You can find resin tapes online or at your local stores.
- Painting base must be raised on our tabletop or working surface. It’s important to place directly on the tabletop, the side of work will stick due to the resin flowing down.

- Make sure your painting surface is horizontal on the top, it is recommended to use the level. Resin may melt and the painting motif will be blurred and not visible.
- Mix resin and hardener for at least 5-7 minutes. Baltic Day art resin mixing ratio is 1:1 based on volume. Use a mixing stick or mixer for stirring. If you mix both components incorrectly, the mixture will remain sticky and tacky.

- It’s time to color the resin in disposable cups. Use high quality Baltic Day resin colors by adding a few grams of pigment. Pour the resin cups separately on your painting ground or use a well known pouring technique – dirty pour.
- For the more interesting color combinations, you can also add some Resi-Blast to color resin. This type of colorant is used for resin cell formation.
- If you notice any tiny bubbles in the painting, you can remove them using a hot air dryer or butane torch. If you are not sure how, check out our article – how to remove air bubbles from resin?

- After a certain time, resin should start drying, the painting should not be changed. The resin mixture becomes viscous and begins to pull out effects like sticky waves. Then painting loses the most important thing – self-leveling. High temperature heating can delays the process.
- Remove dust, hair or any other small things on the resin artwork with tweezers.

- When the artwork is finished, cover it with a protective cover to protect from dust. Using a simple cardboard plate will be ideal for this. Resin becomes hard in 24 hours, but it’s still very sensitive, it becomes fully cured in 72 hours. Protect your artwork from large temperature heat while it’s curing.
- If you are not happy with the image of your work, apply a few more layers as soon as the poured resin has dried (after 4-5 hours).

How to Clean Resin Casting Tools?
When you finish your epoxy painting, you think the work is done. But it’s not… Now you have to clean your painting equipment and tools. If the resin work requires not a lot of resin, you can use the rest of the resin for other small projects such as Petri Dishes, Resin Coasters or Jewelry making. It’s easy to protect the rest of the resin, place the empty cups on a plastic foil ( face down ). It will be easy to separate from the cup on the next working day.
Clean your clothes, mixing tools with isopropyl alcohol. Use alcohol cloth to wipe off other remaining tacky utensils such as butane torch or tweezer. Disconnect any electric devices such as mixers, hit air dryers from the power. Remove any mixing utensils from the resin, otherwise wooden sticks, mixers will harden and it will be very hard to remove them.

How to Clean Resin off Hands?
Clean your sticky hands with a baking soda and dish soap scrub. This method is most common to get resin off of your skin.
- Here is a short recipe for getting resin off:
- Pour 1 small spoon with baking soda to your hand ( don’t add water )
- Pour 1 small spoon of dish soap onto your hands.
- Scrub your hands together.
- Rinse your hands and that’s it!
Another option is to clean your sticky hands with vinegar. There are many hand wash pastes in the stores. Use alcohol to clean your hands only if the resin dries out the skin. Be aware, if resin will get into your skin, it may cause skin irritations.

Adding another Layer of Resin
After several hours after applying resin, you can cast another layer of resin. Adding an extra layer of resin on the top, gives the beautiful depth on the resin painting.
Another option would be to cast one more layer of resin until your first layer is cured completely, after 24 hours. Then you should roughen the artwork with sandpaper so the new resin can stick well. After the sanding, clean the resin art with water or alcohol cloth.

What if my Resin Painting shows damaged areas?
If you notice any holes or dents after drying on your resin painting, the most common reason is you used not enough or too much of resin. Resi-Blast or silicone oil colorants may also have an impact for occurring dents. The best option would be to sand the painting surface and apply another layer of resin.

Most Common Epoxy Resin Art Problems
Epoxy Resin Art has advantages and disadvantages. Working with resin is quite difficult if you are a beginner. Resin art technique is also expensive, high quality resin supplies have high prices. Before you become a professional you will notice many problems such as uncured resin, bubbles, painting surface imperfection, uneven spreading resin and yellowing.
Resin painting is a fun thing to do when you can have several layers on top of each other. Also the costs increase significantly.. Working and pouring techniques are very important, if you have these skills, you will feel the joy and satisfaction and be rewarded with eye-catching artworks.

Above: Baltic Day Epoxy colors mixed with clear resin
Frequently Asked Questions:
Is Resin Art Expensive Hobby?
Yes, sometimes Resin art can be quite an expensive thing to do. A high quality epoxy resin costs a lot especially when you create bigger resin works. Usually it’s the one of the reasons why the resin artworks such as paintings, geodes, coasters and other works cost a lot of money.
Is Resin Art Bad?
Yes and No. Resin has upside and downsides: you create resin art out of plastic, it’s not the most friendly type of art. Also the resin sometimes may be toxic to your health. You should always read the manufacturer’s instructions and tips when working with resin.
Will my resin artwork discolor over time?
If you are using clear epoxy resin without any colorants, some discoloring can take place and yellowing can occur on a white surface. Exposure to sunlight can cause yellowing, so the best option would be to use a resin which is resistant to UV.
What to do if I mixed too little resin and hardener?
Don’t worry, it usually happens to beginners. Just pour a new batch of resin over the old one and that’s it!
Should I seal surface before using resin?
Wood, paper, fabric surfaces needs to have a seal coat. Metal, glass and plastic doesn’t need a seal coat. If you are thinking to seal or not, I recommend to use seal on any projects.
How can I remove tiny bubbles in my epoxy resin?
Bubbles are the most common when working with epoxy, they are rising almost every time. However, it is very easy to remove small ugly bubbles from the surface. Use a hairdryer or heat fun or even a small toothpick to remove them. Check out our informative article – How Do I Get Bubbles Out Of Epoxy Resin?

Easy Resin Craft Projects for a Beginners
Are you ready to try a resin project? From painting to creating coasters, petri dishes, flow art, jewelry and more, possibilities are endless! Looking for more resin and wood ideas? Check our Tutorial for Creative Epoxy Resin Ideas and Projects with Wood Epoxy
Here are Baltic Day Top 15 Resin Art Project Ideas to help you get started:
Epoxy Resin Coasters
Learn how to make beautiful coasters with resin, paint, alcohol inks, glitters and mica powders. This tutorial will show a step by step guide on how to make your first resin coaster. This tutorial - How to make a Resin Coaster - DIY Tutorial will show step by step guide on how to make your first resin coaster.

Resin Cutting Board
Learn how to make a stunning resin cutting or charcuterie board with casting resin and epoxy colorants. Tutorial - How to make Epoxy Resin Cutting Board?

DIY Resin Jewelry
DIY resin jewelry is a beautiful gift for everyone! Make resin keychains, necklaces, bracelets, rings.

DIY Resin Tray
Make a resin tray with wood and epoxy resin. It’s an eye-catching home décor tray with handles.

Resin Wall Art
Use a wood pouring surface along with resin to create a stunning piece of wall art. A perfect decoration for your home! by @refinednaturesantafe

Resin Tumblers
Add glitters, monograms, colorful colors, fun shapes, flakes and more to your tumblers!

DIY Epoxy Resin River Table
Learn how to make a unique river table with wood and epoxy resin. You need to be ready to work with this project, difficulty is medium! Check this tutorial - How to Make a River Table with Wood and Epoxy Resin – Step by Step TUTORIAL

Flow Art Boards
Recreate your favorite ocean waves with Baltic Day pigments! Easily make the flowing waves with a hair dryer.
DIY Resin Earrings and Necklaces
You can make DIY resin earrings and necklaces with a few supplies. This cool resin craft idea is perfect for kids or adults!

Epoxy Resin Lamp
Resin lamp is an interesting and beautiful décor idea for your home. The first time I saw this lamp in my friend's house, I said WOW! I didn’t see this lamp before! Learn how to make Epoxy Resin Lamp with Led Lights

Epoxy Countertops
Every homeowner wants to have beautiful countertop surfaces in their kitchen or any other place. Resin countertop is reasonably priced and you can pour it by yourself! Epoxy Resin Countertop is an ideal surface for your home, especially if you use the surface a lot in your kitchen or work space. This countertop was made with Baltic Day mica powders by @sassy.resin

Epoxy Bar Tops
Create your own bar top that is beautiful and long-lasting. The epoxy does not absorb any foods or drinks, as it is non-porous. This is another great resin art idea! This epoxy bar top is made with Baltic Day epoxy colors by @sassy.resin

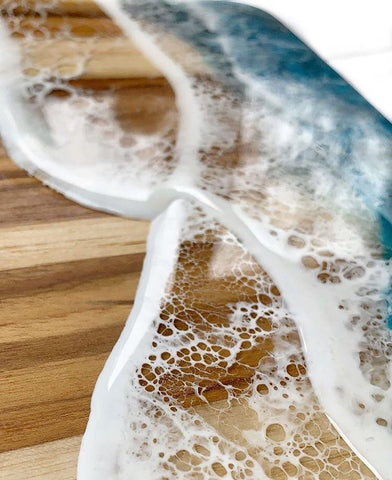
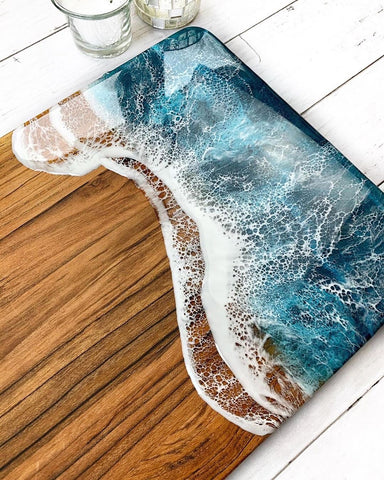
Resin Beach Art
Create beautiful resin beach idea boards or trays. Create realistic ocean waves with Baltic Day mica pigments and epoxy resin.

Epoxy Resin Business Card Holders
Another great idea is to create business card holders. This resin art project is a great way to experiment with epoxy which does not require a lot of resin. These card holders were made with Baltic Day resin colorants by @fordian_woodworks

Epoxy Resin Artwork with Embedded Object
Make unique and eye-catching resin artworks with embedded objects. This is an example of a resin board with embedded champagne stoppers by @gamepoxy

We hope this information will help you to start working with epoxy resin. Resin craft art is very wide and interesting. Do you have any questions or comments? Please leave them in the comments below!
Comments
Leave a comment